From Obsolete to Accessible: Restoring Data from Old Gorenje Dialog Floppies

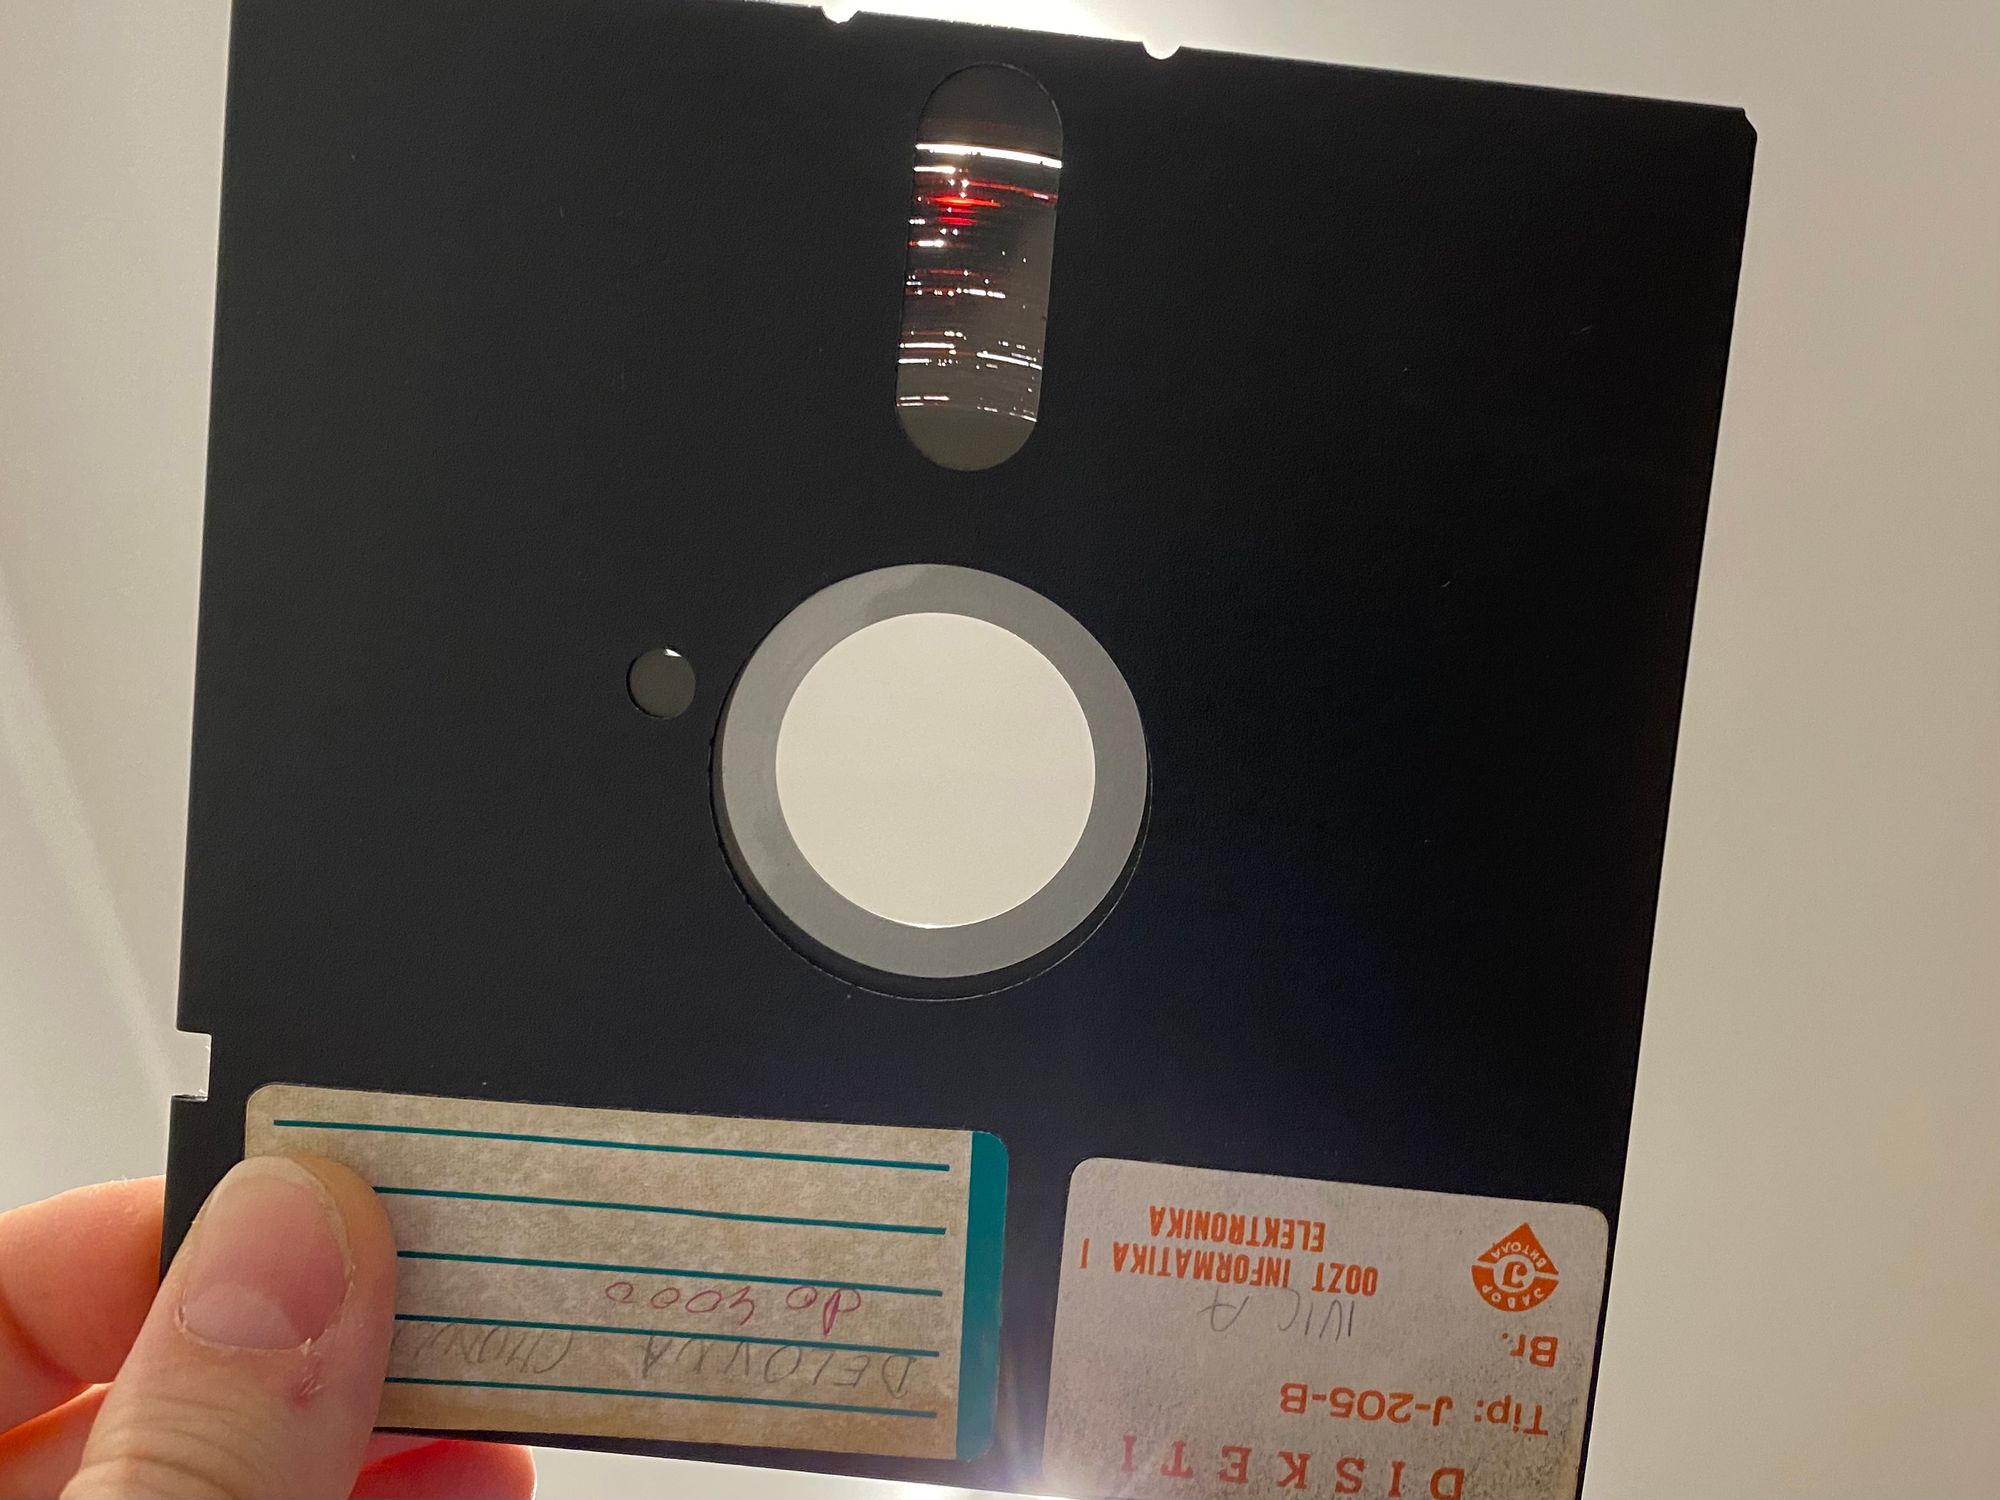
Recently, our team was presented with a unique challenge - retrieve data from 30-40-year-old floppies that contained data and programs for Dialog, a relatively rare Slovene computer. Despite the odds, we were quite successful in the task.
To retrieve the data from the old floppies, we used Kryoflux - a USB-based device designed specifically for acquiring reliable low-level reads suitable for software preservation. With the help of Kryoflux and a standard 80-track floppy drive, specifically, the Newtronics Mitsumi D509V5, we were able to read the magnetic flux transitions on the disk and reconstruct the data in a way that was faithful to the original.
The floppies we worked with had two sides, with 80 tracks per side, 5 sectors per track, and 1024 bytes per sector. Such a configuration would normally denote high-density floppies, but in our case, they were double-density floppies.
Our process of reading the data in the end converged to the following steps:
1. Check the maker of the floppy. Different manufacturers used different magnetic materials and coatings, which could affect the readout quality. For example, if you learn that a certain manufacturer's floppies from the same batch tend to disintegrate in the drive, you might want to avoid reading them entirely. Similarly, if you notice that a read heavily changes the magnetic disk by leaving scratches or marks, you might want to leave those disks for the end of the process, because that will also smear the drive heads and you will need to clean them.
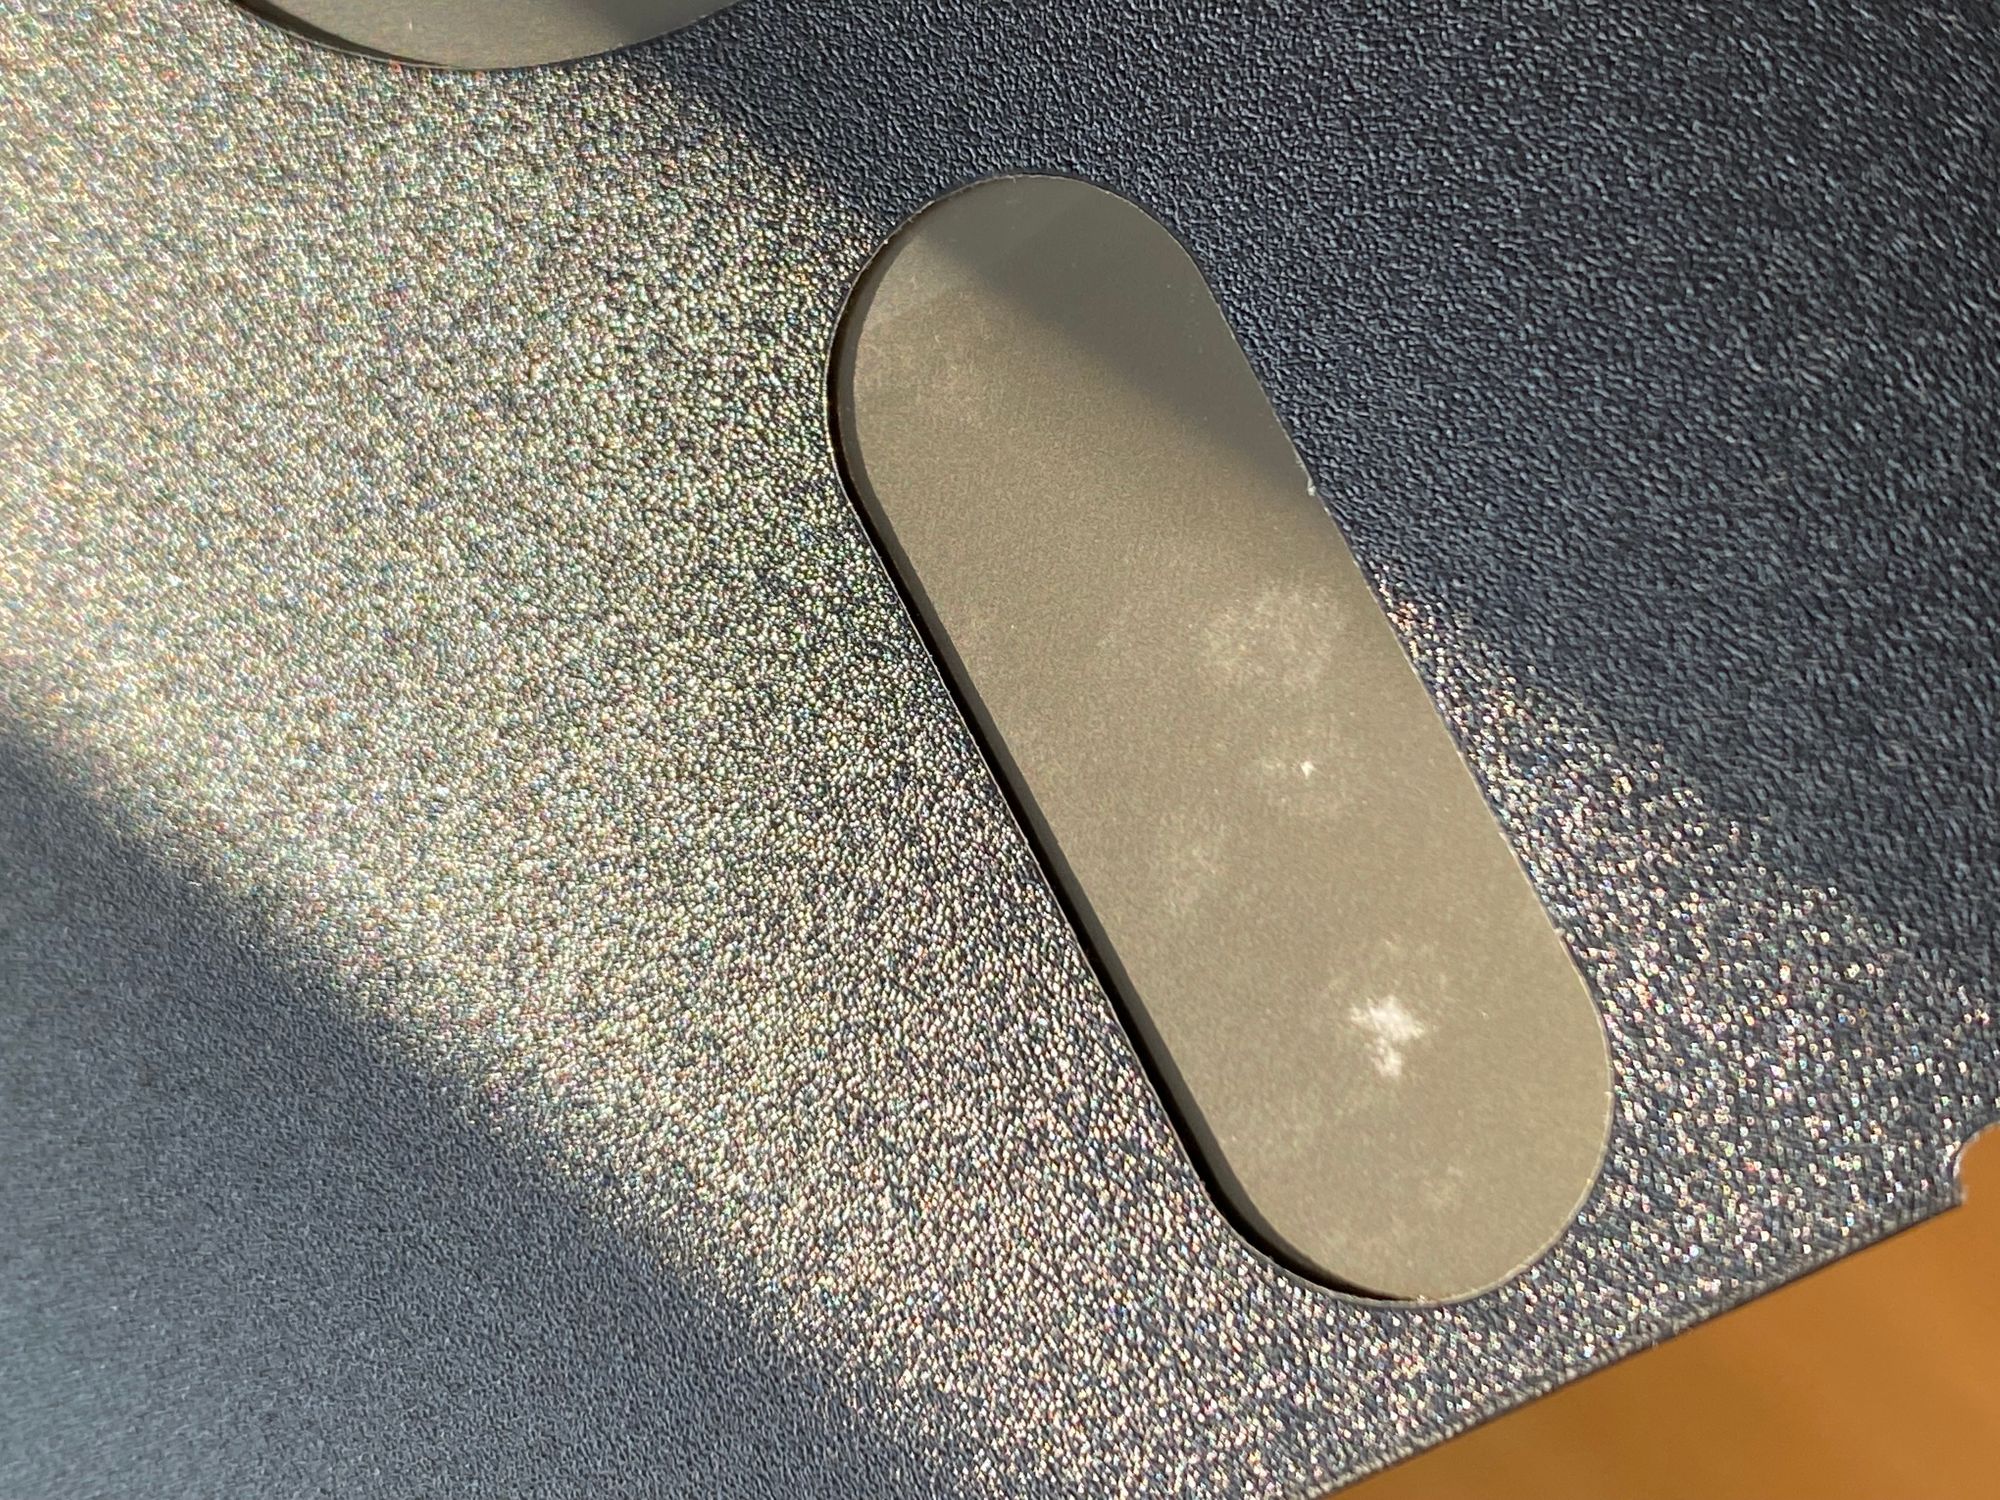
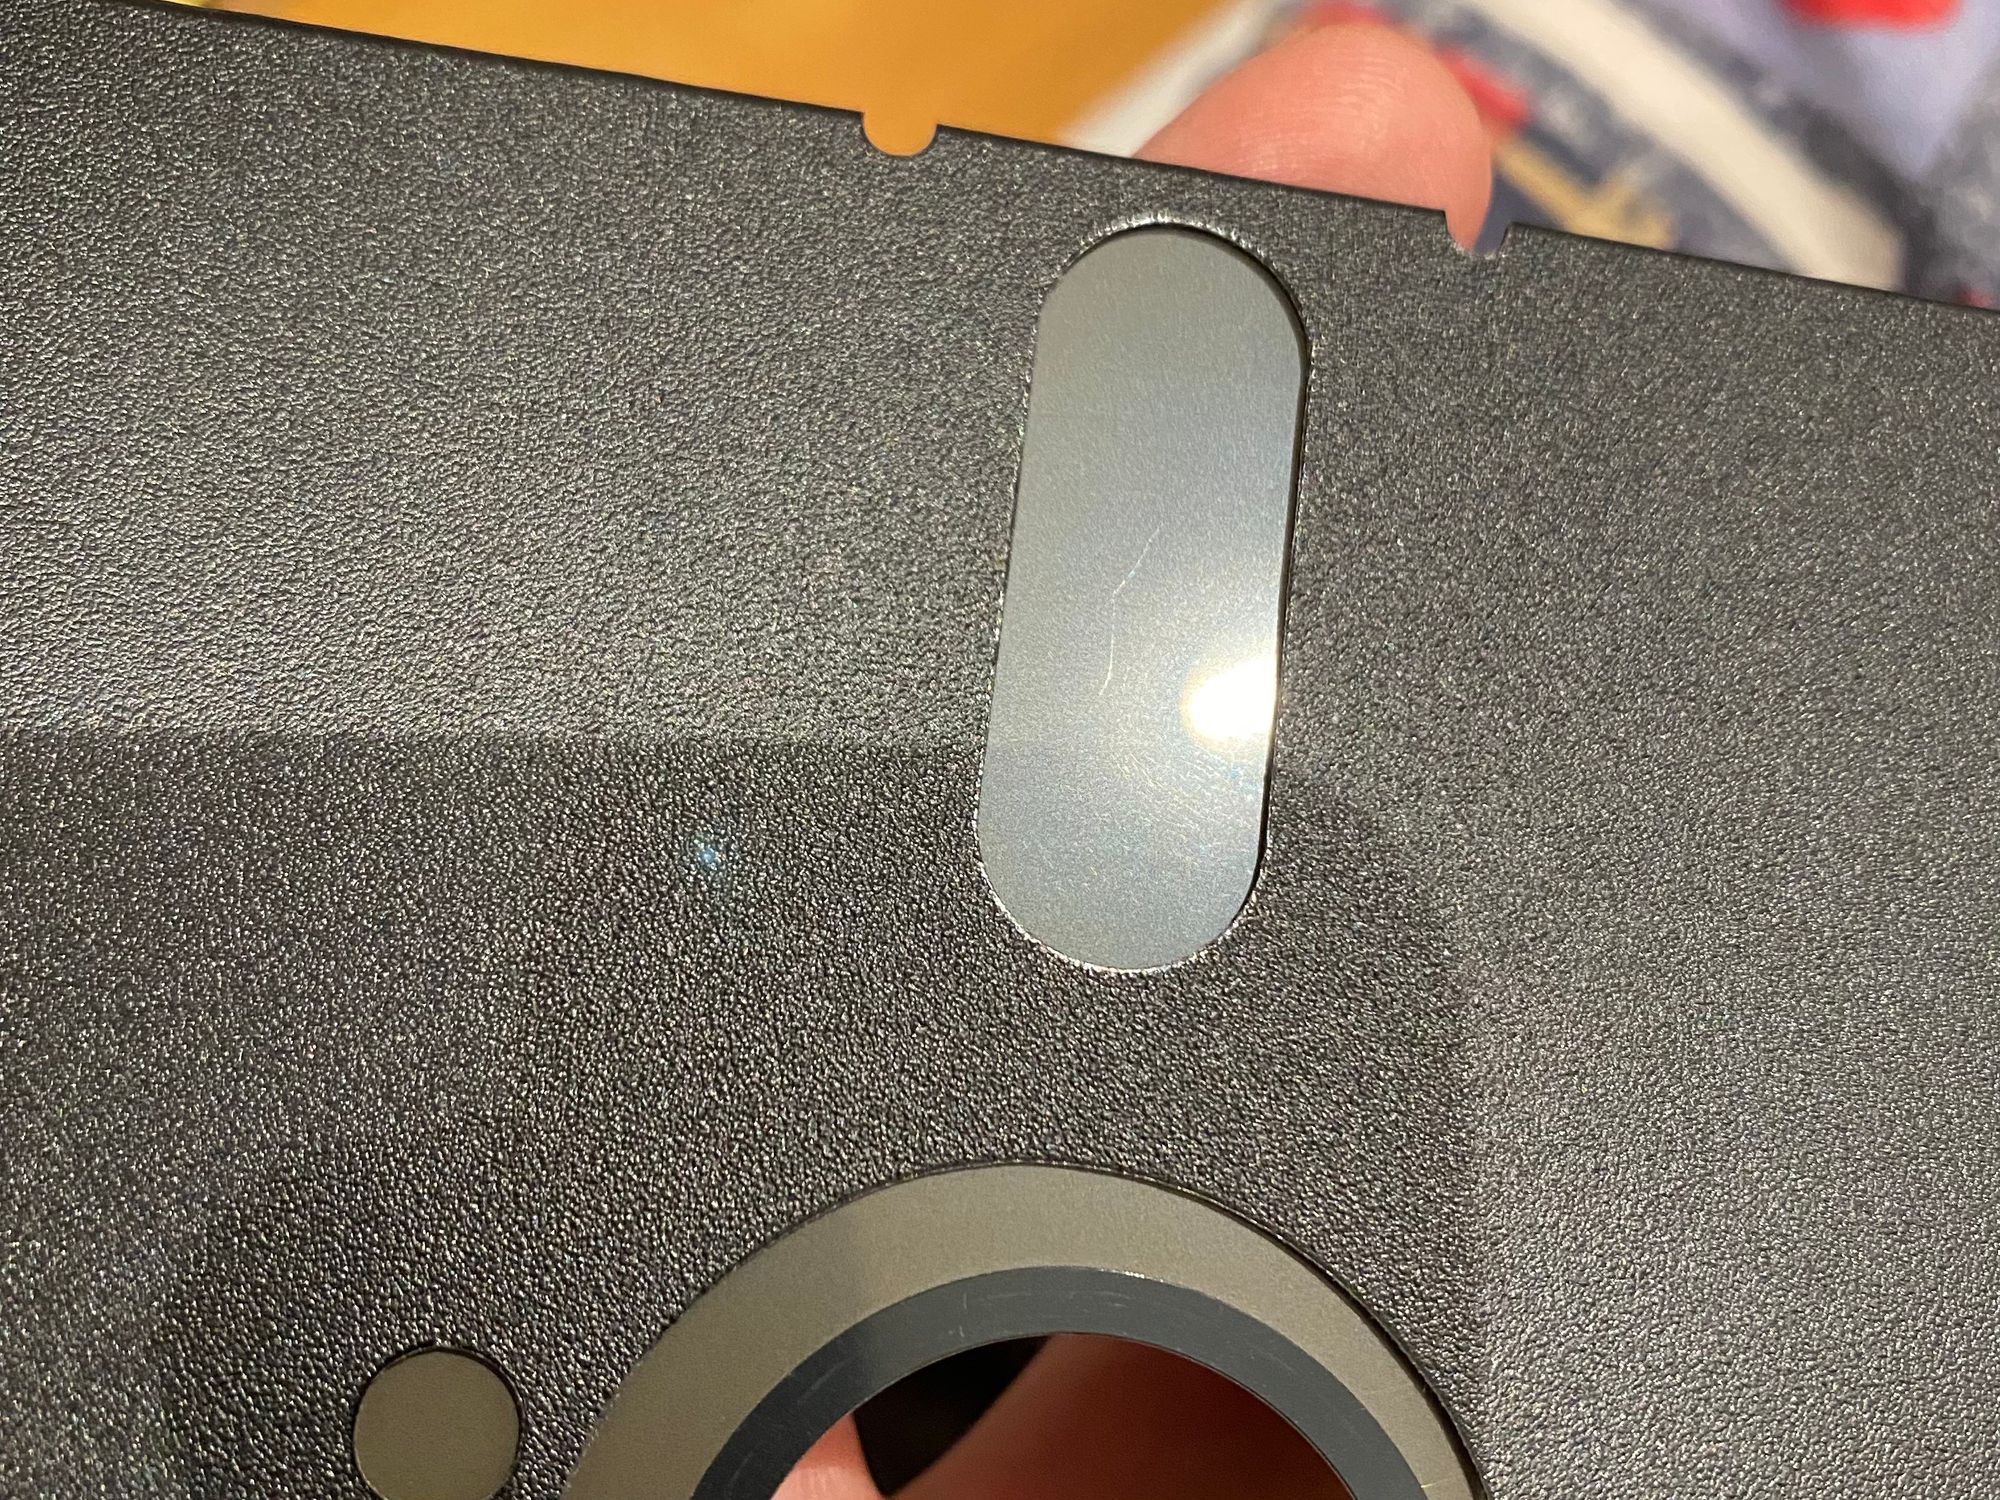
2. Inspect the magnetic disk visually. Look for any signs of damage, such as scratches, mold, or dust. This is important because you want to remember the state the disk is in so you can see if the read visibly damages the disk. Furthermore, if you notice dust on the disk, gently blow it off before inserting the floppy into the drive. If you notice mold on the disk, clean it gently with a cotton swab and isopropyl alcohol, being careful not to damage the magnetic surface of the disk. If you notice heavy scratches, just be aware of them, as there isn't much you can do to repair the damage.
3. Insert the floppy and note the sounds coming out of the drive, such as clicking, grinding, or squealing. These sounds usually appear immediately after closing the drive door as the drive spins up. If you hear any worrying sounds, it's important to take caution. It may be best to do a partial read instead, then abort and check what happened to the disk before proceeding with a full read. You might want to read such floppies at the end, or if there is no visible damage, proceed with reading them anyway.
4. Read the floppy using Kryoflux. This involves connecting the floppy drive to the Kryoflux device and running the appropriate software to extract the data from the disk. You can choose to do either a full or partial read. A full read involves reading every track on the disk, while a partial read involves only reading specific tracks. We will talk more about this step later on.
5. Inspect the magnetic disk visually again. Look for any new signs of damage that may have occurred during the readout process. By checking for any new signs of damage, you can determine whether you can simply re-read the floppy to retrieve more good sectors. If the condition of the disk did not change, this is possible. However, if the disk deteriorated during the readout process, you should be careful with your next read and only attempt to read the missing tracks. If the disk disintegrated completely, there is nothing you can do, and subsequent reads will be in vain. In such cases, you need to clean the drive heads, as the material that fell off the disk is most likely on the drive heads.
6. Check the retrieved data. After the data has been retrieved from the floppy, it is important to check the integrity of the data. One way to do this is to use the HxC Floppy Emulator software to decode the data and identify any bad sectors with incorrect CRC codes. This information can be used to determine which tracks need to be re-read or where on the magnetic disk an issue may be located. Another tool that can be used to check the state of the data is the Kryoflux Disk Tool Console (DTC) software. This software can identify which tracks contain bad sectors. This information is crucial for attempting to fix issues, re-read data, and/or reconstruct the data. We will talk more about this later on in this post.
7. Clean the drive heads if necessary. When reading deteriorated floppy disks, there is a chance that material from the magnetic disk has ended up on the drive heads, which can not only prevent the drive from reading subsequent floppies, but can also damage them. If you notice that the read has caused heavy deterioration of the disk, it's important to clean the drive heads carefully. However, cleaning the heads can be a delicate process, and if done incorrectly, it can render your drive useless. To clean the heads, you can start by gently blowing towards the drive heads. If you still see black specks on the heads, you can use a flattened cotton swab with isopropyl to gently clean the heads by barely touching them, being careful not to lift the upper head.
8. Repeat the read if necessary. After completing the read of the floppy and examining the retrieved data, you may find that there are still some bad sectors that were not successfully read. In this case, it may be necessary to repeat the read. However, it's important to note that repeated reads can further damage the magnetic disk, so you should only do so if you believe it's necessary and the disk is still in good enough condition. It's generally best to re-read only the tracks that were not successfully read, rather than re-reading the entire disk. Once you have successfully read all the necessary tracks, you can then combine the data from each read into a full image of the floppy.
In the following section, we provide more details on how we used the Kryoflux and HxC software for reading and decoding our floppies.
Reading with Kryoflux DTC. Kryoflux's DTC (Disk Tool Console) is a tool for reading and writing floppy disks. To read a floppy disk, we used the following command in the Windows console:
dtc -d1 -ffloppy_name\floppy_name_ -i0
Here, -d1 specifies the drive number, floppy_name is the name of the floppy disk we want to read, and -i0 specifies that we want to perform a low-level read for archival purposes. Please refer to the DTC Manual for more information.
Checking for Successful Read. After reading the floppy disk, we needed to check whether the read was successful. To do this, we issued the following command:
dtc -m1 -ffloppy_name\* -i0 -ftest.img -z3 -i4 2>&1 | findstr "failed mismatch unformatted"
The following explains the parameters that we used. Once again, please refer to the DTC Manual for more information.
-m1: Enables the image file input.-ffloppy_name\*: Specifies the image files to read.-i0: Specifies the format of the input image file.-ftest.img: Specifies the output file for the decoded image.-z3: Specifies the sector size (in this case, 1024 bytes).-i4: Specifies the format of the output image file (MFM, 80 tracks).2>&1: Redirects error messages to standard output so they can be piped to the next command.|: Pipes the output of the DTC command to the "findstr" command.findstr "failed mismatch unformatted": Searches the output for the strings "failed", "mismatch", and "unformatted", and displays any lines that contain them. This is used to determine which tracks, if any, had errors during the read process.
If the read was not completely successful, the above command will expose any bad tracks that may have been encountered during the read process. For example:
44.0    : Read operation failed
45.0    : Read operation failed
80.0    : MFM: <unformatted>
80.1    : MFM: <unformatted>
81.0    : MFM: <unformatted>
81.1    : MFM: <unformatted>
82.0    : MFM: <mismatch>, *NT
82.1    : MFM: <unformatted>
83.0    : MFM: <unformatted>
83.1    : MFM: <unformatted>
In the above example, tracks 44 and 45 (on side 0) were not read successfully, and tracks 80 to 83 were either unformatted or had a mismatch. However, note that unformatted and mismatched tracks after track 79 (which is the 80th consecutive track) are usually not a cause for concern on an 80-track floppy disk.
Given the above, we should re-read tracks 44 and 45 to ensure that the data is fully recovered. When re-reading, it is important to use DTC's options -g, -s, and -e to properly target the bad tracks. The -g option allows DTC to read only one side of the disk. The -s option specifies the start track to read, and the -e option specifies the end track to read. By specifying the range of affected tracks, DTC can focus on recovering only the necessary data, reducing the risk of further damaging the disk.
If we have created multiple images of a floppy disk using the Kryoflux DTC software, the next step is to combine the resulting tracks. This can be done simply by copying the corresponding track files into the same folder.
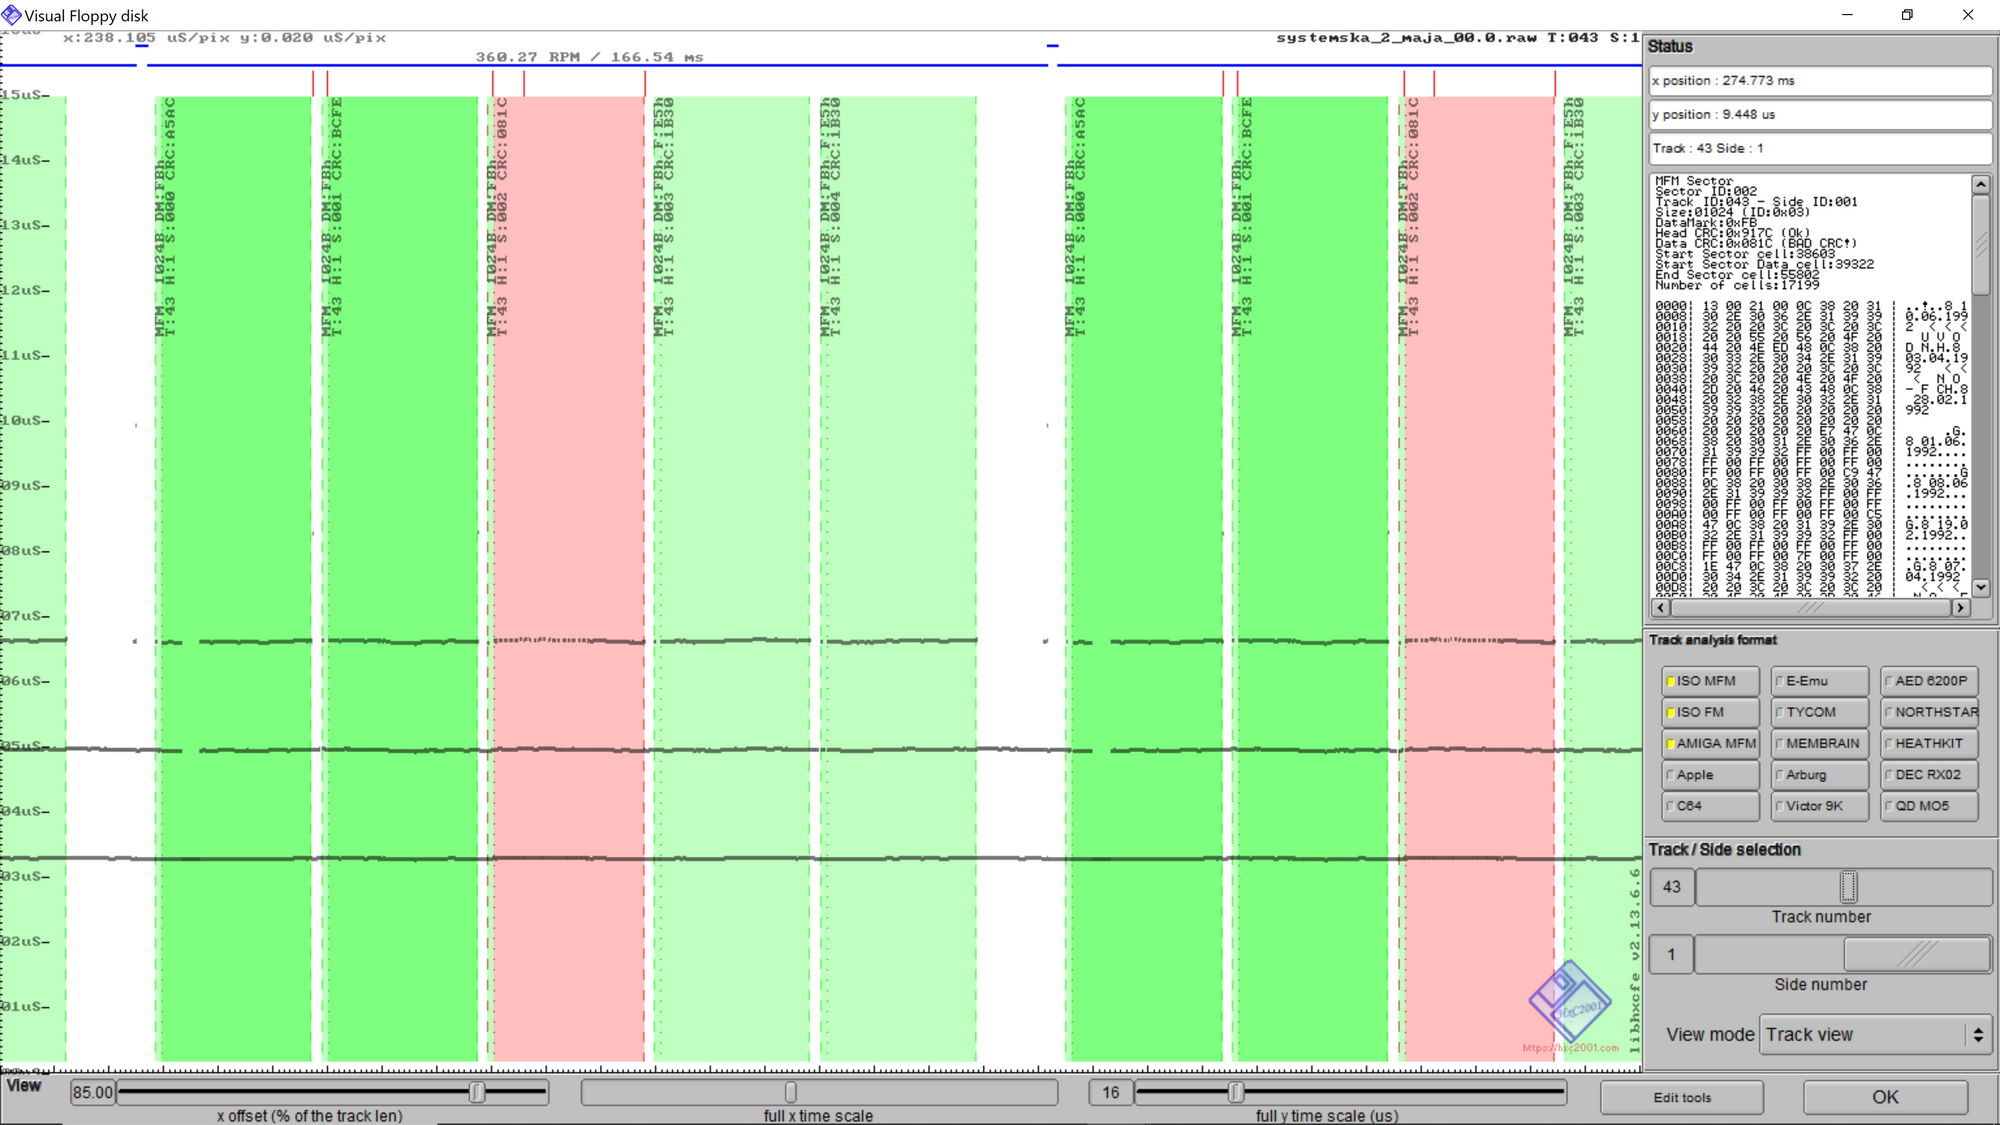
Another software we used to check the success of our reads is the HxC Floppy Emulator software. This software allows us to visualize and analyze the data acquired with Kryoflux. The visualizations provided by the HxC software are especially helpful in showing the location of damaged areas on the disk. We can then visually inspect the damaged area to see if it can be cleaned or fixed in some other way.
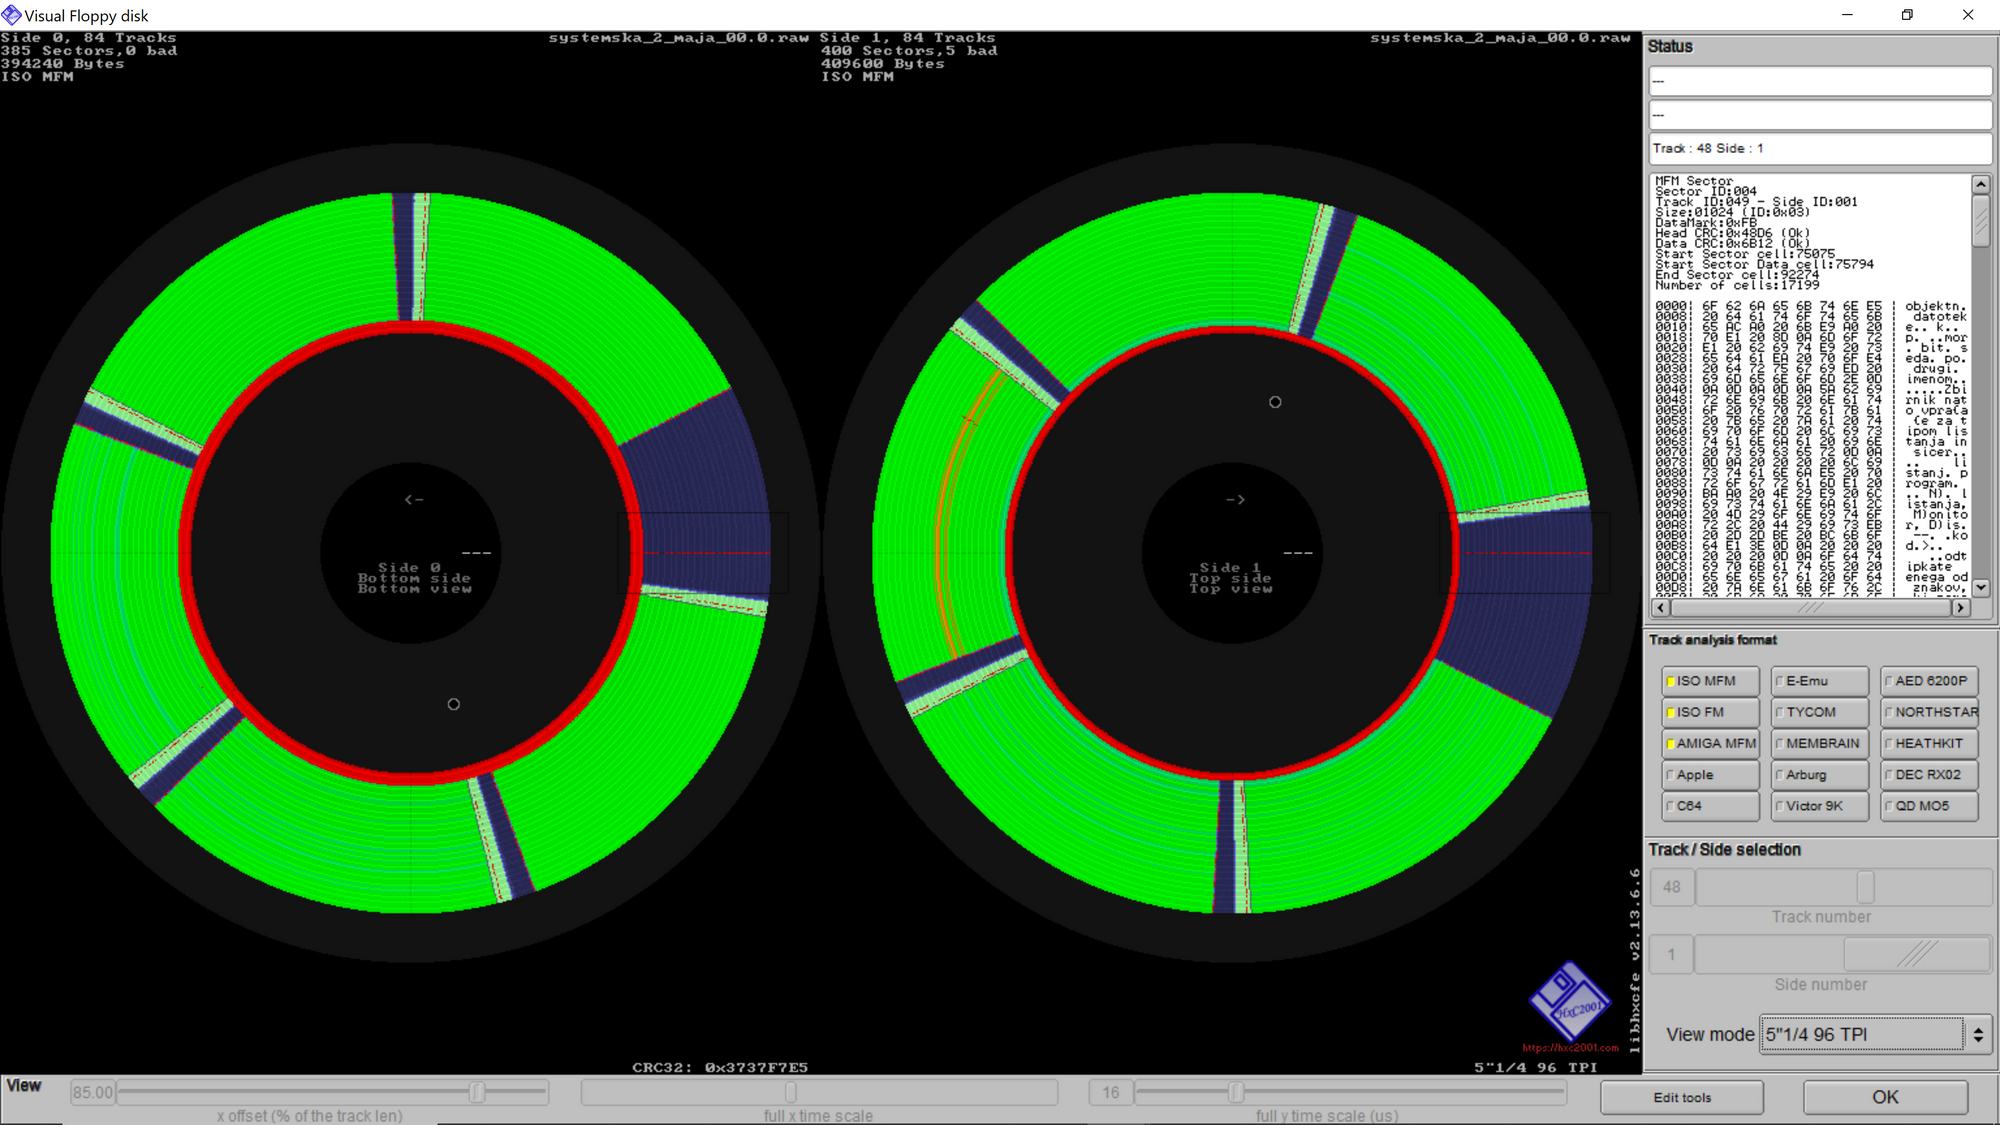
Moreover, the HxC software provides detailed information about the exact location of the damaged sectors. This information can be useful for reconstructing tracks from sectors, a process that can be challenging but is achievable with the help of specialized tools.
In Conclusion... We have outlined the process we used to quite successfully read and decode 30-40 years old floppy disks. By using the Kryoflux DTC software, we were able to read and assess the quality of the data, and then by using the HxC software, we were able to analyze and visualize the data to determine its integrity.
We want to emphasize that the methodology we presented here is not intended as a recommendation, but rather as a record of what worked for us in our specific case. The process of reading and decoding old floppy disks can be complex and challenging, and the results will vary depending on the condition of the disks and other factors.
If you are attempting to recover data from old floppy disks, we recommend that you carefully research the available methods and tools, and consult with experts if necessary. With patience, persistence, and a bit of luck, it is often possible to recover valuable data from these seemingly unsalvageable storage media.
Resources
These Kryoflux floppy images are available here: